Tuesday, December 7, 2010

Holiday Stamp A Stacks - Spots still available

Hi there My Stamping Friends,

I wanted to let you know that I still have space in some of my Holiday Stamp a Stacks. If you haven't heard, the schedule is as follows:

Tuesday Dec 7, 2010  at 7:30pm - 9:00pm Stamp-A-Stack #1 (evening event)
Still need time to get your Christmas Cards finished? Now is the perfect time. Come over and get a few more Christmas/Holiday ** cards checked off your list.. ..and nibble on some holiday candies while you’re here.
You will get to make 15 Christmas/Holiday ** cards (5 cards each of 3 different cards). The fee is $20 and includes a roll of ribbon to complete your cards and you get to take the rest of the roll home. You can make a second set of cards for only $15 (additional sets will not include an additional roll of ribbon). Please let me know how many cards you would like to make when you RSVP. This is the evening offering of the Stamp-A-Stack #1 for Christmas Holiday Cards. I will be hosting four Stamp-A-Stack events in December (a Stamp-A-Stack #1 daytime and evening and a Stamp-A-Stack #2 daytime and evening event). The #1 classes will offer the same cards during the day and evening events but will be different cards from the #2 classes. I will try and post photos on my blog very soon.

Please RSVP by December 1st so I have supplies prepared for each participant.

** You can feel free to leave the sentiment off and change them into general holiday cards.


Wednesday Dec 8, 2010 at 10am-11:30am Stamp-A-Stack #1 (daytime event)

This is the daytime offering of the Stamp-A-Stack #1 for Christmas Holiday Cards. I will be hosting four Stamp-A-Stack events in December (a Stamp-A-Stack #1 daytime and evening and a Stamp-A-Stack #2 daytime and evening event). The #1 classes will offer the same cards during the day and evening events but will be different cards from the #2 classes.
Thursday Dec 9, 2010 at 7:30pm - 9:00pm Stamp-A-Stack #2 (evening event)
You will get to make 15 Christmas/Holiday ** cards (5 cards each of 3 different cards). The fee is $20 and includes a roll of ribbon to complete your cards and you get to take the rest of the roll home. You can make a second set of cards for only $15 (additional sets will not include an additional roll of ribbon). Please let me know how many cards you would like to make when you RSVP.

This is the daytime offering of the Stamp-A-Stack #2 for Christmas Holiday Cards. I will be hosting four Stamp-A-Stack events in December (a Stamp-A-Stack #1 daytime and evening and a Stamp-A-Stack #2 daytime and evening event). The #1 classes will offer the same cards during the day and evening events but will be different cards from the #2 classes. I will try and post photos on my blog very soon. ** You can feel free to leave the sentiment off and change them into general holiday cards.

Mon Dec 13, 2010 at 10:00am - 12:30pm Stamp-A-Stack #2 (daytime event)This is the daytime offering of the Stamp-A-Stack #2 for Christmas Holiday Cards. I will be hosting four Stamp-A-Stack events in December (a Stamp-A-Stack #1 daytime and evening and a Stamp-A-Stack #2 daytime and evening event). The #1 classes will offer the same cards during the day and evening events but will be different cards from the #2 classes. I will try and post photos on my blog very soon.

Please RSVP by December 1st so I have supplies prepared for each participant.
** You can feel free to leave the sentiment off and change them into general holiday cards.


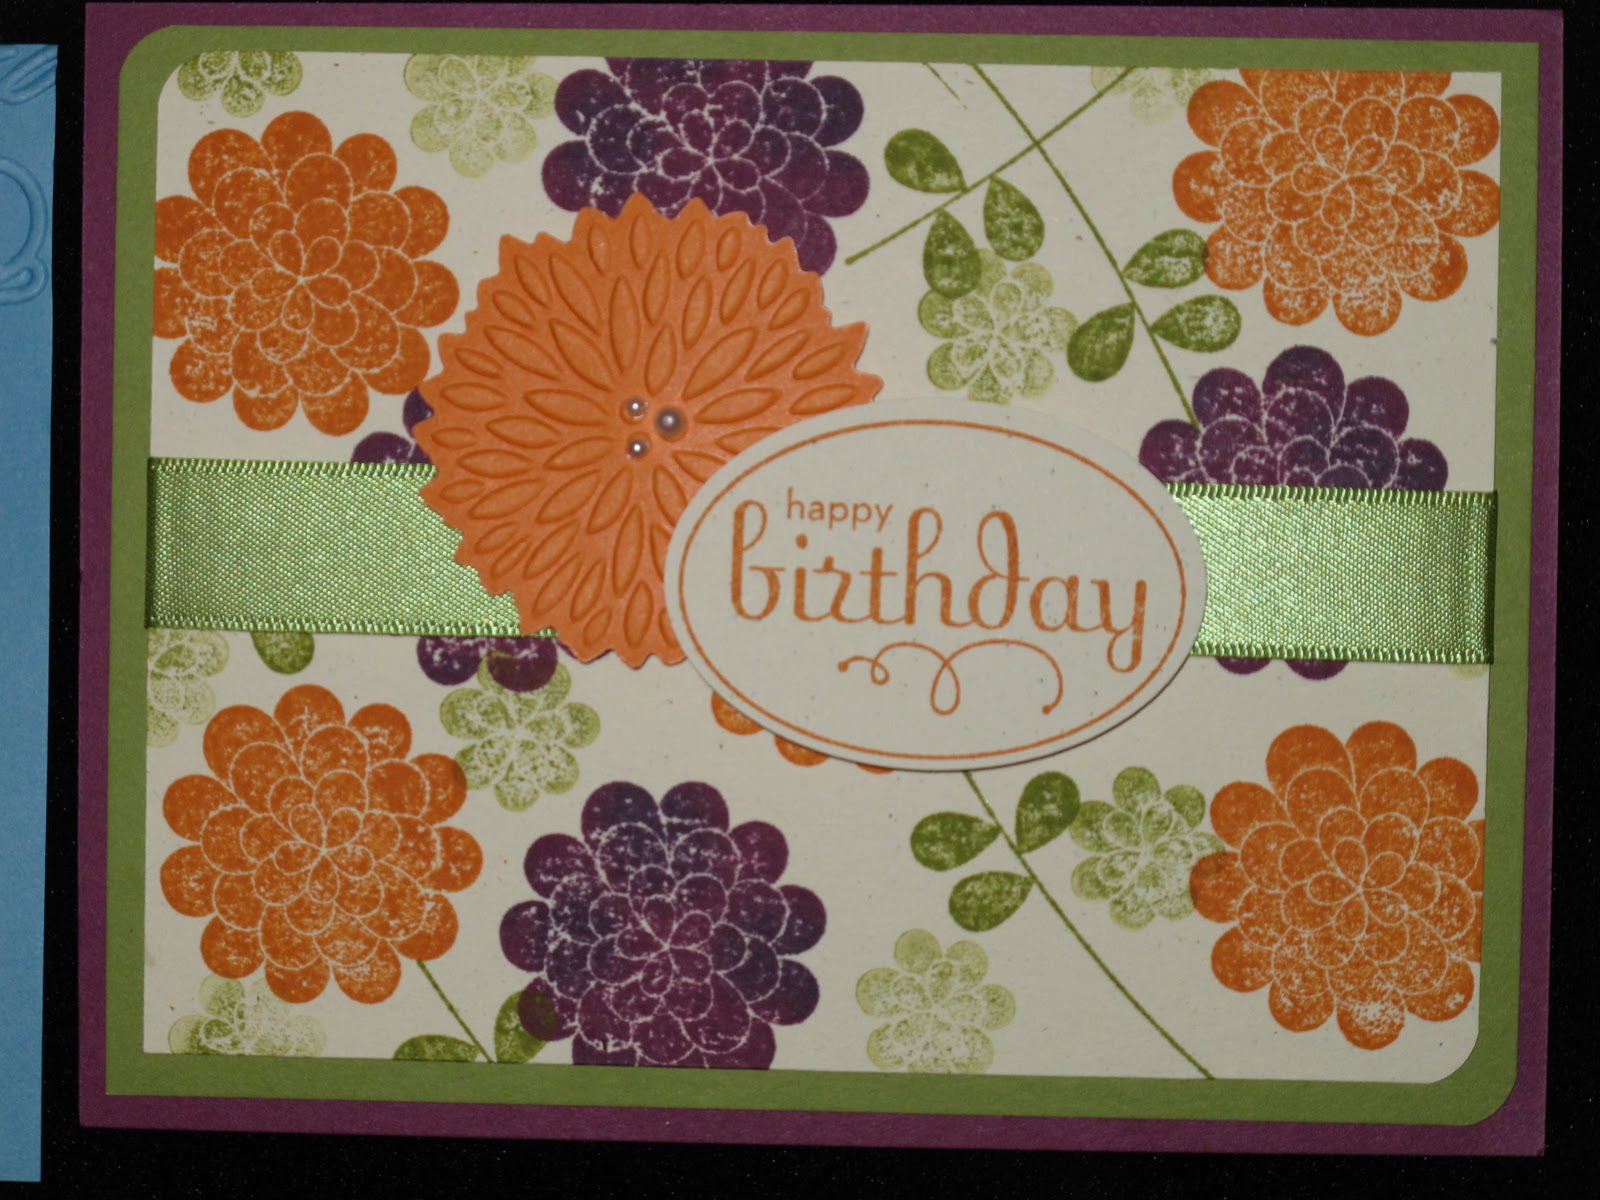
Here is a sneek peek of what the Stamp-A-Stack #1 cards look like.


Hope you can join us tonight or at one of the SAS events this week. Email me at
StampingWithRose-Ellen@cox.net or call me at 703-200-2340.

Monday, November 29, 2010

In like a lion.....

Hi there My Stamping Friends,

For me it seems like the Holiday season 'comes in like a lion'. I'm not really sure where summer went and now we're already past Thanskgiving and we're gearing up for Christmas. WOW!!!

Well, December for me means making LOTS of Christmas Cards. I've been making a few at a time for the last several months but I still have a bunch more to go. This is a card that I created after seeing so many different versions on Stampin' Connection (which is sort of a version of FaceBook for Stampin' Up! demonstrators~and you can have access within moments if you purchase the $300+ kit on sale now for less than $88). Thanks to all my fellow demonstrators for the inspiration.


The base of this card is cherry cobbler. I used the Big Shot to cut out a top note die from confetti cream cardstock. The tree branches were made using Lovely as a Tree with old olive ink and the sentiment was stamped in cherry cobbler using Four The Holidays. The strip of DSP and the ornament was punched from papers from the Jolly Holiday pack. I used the silver tinsel as an ornament hook and wrapped one end around the ornament and put the other end through the top note die so it looks like its hanging on a branch. It might looke like a complicated card but it wasn't at all.

If you want to purchase any of the items needed to make this card you can visit my website at http://www.roseelleneastman.stampinup.net/ or you can email or call me.

One more Thanksgiving project

Hello there My Stamping Friends,

I wanted to get one more Thanksgiving project posted before December arrives. Last week, one of my very talented and creative stampin' friends, Donna, showed up to hostess her club meeting with a little gift for everyone in attendance. This little guy is so cute and I had to copy him. Donna spent a lot of time freehand drawing each of the heads and cutting out each piece for the face. She made the body with the Milk Carton die and the Big Shot (and you all know how much I LOVE my Big Shot). I believe she made the tail with some large heart punch. Here is her creation.


I had to CASE these turkeys for my Thanksgiving table and of course I only use Stampin' Up! products and I needed to make it easy so my girls could duplicate them, so here is what I came up with.


For my turkey I also used the Milk Carton die and the Big Shot. I used our Full Heart punch and the scallop circle punch for the tail. I used the Round Tab Punch for the head, a point of the star punch for his beak and the Heart to Heart for his waddle and ...hmm...thing that's on his head. For his eyes I used the Black Flourish Designer Jewels from the Holiday Mini Catalog (they aren't just for Halloween Projects!!). I used Teeny Tiny Wishes for the sentiment and used the word window and modern label punches along with dimensionals to show it off.

As always if you want to purchase the items you need to create a project like this you can visit my website at http://www.roseelleneastman.stampinup.net/ or call or e-mail.

Hope you enjoy the project and have a great day,
Rose-Ellen

Sunday, November 28, 2010

Happy Thanksgiving!!!

My Dear Stamping Friends,

I hope you all had a wonderful Thanksgiving Holiday. Our family certainly had a lot to celebrate this year. The most wonderful news is that our daughter Shannon celebrated one full year of being in remission from cancer. Thank God!! And Thank You for all the prayers and support you've shown us for the past few years. We had my sister-in-law and her husband and boys over for a yummy Thanksgiving dinner and had a wonderful time.

Friday was a busy day. As a Make A Wish family, we were asked to represent MAW and ride with Santa and Mrs. Claus on their horse drawn carriage in a local parade. My husband and our youngest daughter and I watched from the best seats in the house while our three older girls got to ride the carriage.


 After that we were home for a little bit before we headed off to a local town celebration where Shannon was asked to light the town's Christmas tree with the Mayor and then meet Santa. It was another fantastic celebration and we all had so much fun.


We are so fortunate and blessed and so thankful!!

I want to let you all know that I am thankful for you as well. To my amazing downline, you make my job so much fun! To my wonderful Stamping Friends, you are one of the biggest reasons I love this job and I am very thankful that I have you in my life. To my wonderful family, thank you for your unconditional support. I couldn't do this without you.

Here is a card that I saw on someones blog. I loved it so much I had to CASE (Copy And Share Everything) it almost exactly.  I used the Day of Gratitude stamp set and the decorative label punch here. Feel free to contact me with any other questions about the card. I thought I knew who's blog I saw it on but when I just went there to get a link, it wasn't on her blog. Hmmm....If its yours and you find it before I find you, let me know and I'll post a link here.


And here is a simple card I made with some inspiration from Stampin' Connection (which is sort of a Facebook for Stampin' Up! demos). This is a great time to remind you that Stampin' Up! is running a promtion where the entire contents of the starter kit (valued at $310+) only costs $87.50!! You can find out all the details by clicking on the link above (if you're getting this post in a reader you need to visit my blog to see the link).

This card features Autumn Splendor and the woodgrain background stamp. I used the rock-n-roll technique for the leaves and Teeny Tiny Wishes for the sentiment.

Enjoy the cards and enjoy the rest of your Thanksgiving weekend.
Rose-Ellen

Monday, November 15, 2010

All the supplies in the Full Starter Kit for only $87.50 !!!

 Hi there My Stamping Friends, Have I got some news to share with  you today!!!
This is an unprecedented OPPORTUNITY and this is NOT a MINI KIT!!! This promotion is for the FULL STARTER KIT....a $310+ value for only $87.50. AMAZING!!! On top of that you'll get FREE SHIPPING for your starter kit!!

Run, do not walk, to your nearest telephone or computer and contact me with ANY questions. I'm available to help you anytime!

I'm putting on my best television announcer voice now so here are the details:
~~~~~~~~~~~~~~~
What do you call it when you get over $310 in crafting and business supplies for only $87.50? You call it an amazing deal but we're calling it an amazing opportunity! From November 15-30, you can purchsae either our Standard or Digital+ Starter Kits at 50% off the reguarl retail price of $175 (PLUS FREE SHIPPING!), and enjoy these great benefits as a Stampin' Up! demonstrator.

Here are a few of the benefits of purchasing the Starter Kit:
  • $310+ worth of supplies for only $87.50.
  • Earn a minimum of 20% income on your purchases.
  • Be your own hostess and earn your own hostess rewards.
  • Sharing creativity with other demonstrators, family and friends.
  • Make new and lasting friendships.
  • Enjoy access to nearly unlimited creative ideas.
  • Receive a free subscription to an exclusing monthly magazine.
  • Receive two free months subscription to your own busniess website.
  • Ability to preorder your items a month before the published date.
  • Opportunity to earn free products and incentive trips.

Here are a few benefits of joining my team:
  • Enjoy local downline meetings to share creative and business ideas with your peers.
  • Join us via Skype at my downline meetings.
  • Travel with people you know to the Stampin' Up! Regional Meetings, Annual Convention and Leadership Seminars.
  • Join our team on-line for answers to any of your questions.
  • Attend my quarterly two day stamping and cropping events FREE.

If you've ever considered doing this or if your considering it now, you can check out more information about becoming a demonstrator on my website here. Click on the link that says 'Start your own business' (you DO NOT have to commit to anything at that point). You will be able to find lots of information there including a video, the benefits of being a Stampin’ Up demonstrator and more information on Stampin’ Up!. If you are still interested in even more information you can click on the button on the left that says ‘join now’ (you still don’t have to commit to anything) At that point you can read the agreement more info about joining, and get any questions answered, without having to commit to anything. If you have all your questions answered and want to sign up, it will ask you for a password and my password is "newrecruit" without the quotes. You can be a demo in a matter of minutes and have access to the Stampin’ Up! website full of ideas and inspiration.


Please let me know if you have any questions. I can be reached on my cell phone at 703-200-2340.

 
Have a great day!!
Rose-Ellen

Thursday, November 4, 2010

Its amazing what Silver Tinsel Trim will do.....

Hi there My Stamping Friends, Today I'm jumping ahead a little bit and I'm sharing two Christmas Card I recently made. First I made a very simple card inspired by a card that I saw online, and then I jazzed up my first verion a bit. The first version is fine, but isn't it amazing what a little Silver Tinsel Trim will do. What do you think?


For these cards I used: Bashful Blue for the card base and ran it through the Big Shot using the Perfect Polka Dot impression folder. I stamped the ornament in real red ink on whisper white cardstock and punched it out using the ornament punch. I used Candy Cane Christmas designer series paper to dress up the bottom of the card. Teeny Tiny Wishes is my current go-to set for sentiments and I used it here with the Modern label punch and some real red sponging around the edges. I dressed up the ornament with Basic Rhinestones and on version #2 I used some Silver Tinsel Trim on top of the ornament.

Hope you like the cards,
Rose-Ellen

Tuesday, November 2, 2010

Autumn Cards from the Baltimore Regional

Hi there My Stamping Friends,

I hope you all had a fantastic Halloween. We certainly did at our house. We went to lots of fun Halloween parties at the girls schools and in our neighborhood, spent lots of time trick or treating and my girls ended up with LOTS of Halloween candy. Before they even dug in to thier loot, they actually pulled out a large amount of it to give to a homeless shelter for kids that didn't have an opportunity to go trick-or-treating. Apparently they WERE paying attention in church that morning when our priest suggested the idea. I'm a proud Mama!!

Anyway, with Halloween over (Boo Hoo Hoo!!!) I thought I'd share a few more cards from the Stampin' Up! Baltimore Regional. This time I'll cover the Fall/Thanksgiving theme. If they are your cards, please let me know and I'll give you credit.

I'm working on a charity cropping event scheduled for this weekend at the Dunn Loring Volunteer Fire and Rescue Department (you can friend us on facebook and find all the info) so my week is pretty booked up. I hope this tides you over. Of course if you'd like to purchase any supplies feel free to call or e-mail me or shop 24/7 online at my website http://www.roseelleneastman.stampinup.net/


Enjoy!
Rose-Ellen


Thursday, October 28, 2010

Halloween Card Samples from the Stampin' Up! Baltimore Regional Seminar

Hi there My Stamping Friends, I'm sorry its been so long since I've posted. I've been busy booking workshops and showing my hostesses what to do to have the best party they can have.

Today I thought I'd post some photos from the Baltimore Regional. I got some of them from swapping, some are photos from cards that I liked and some are from the sample boards. I don't know who made all the cards, but if I have thier name I'll give them credit. If you're visiting my blog and you see one of your cards, let me know and I'll post your name and give you credit.

Here are some of my favorite mostly-Halloween cards from the Baltimore Regional:

I LOVE LOVE LOVE this one. What a great 'out of the box' card to give a couple for thier wedding. I can see using their wedding colors or even a little monogram on the towels. Very cute!! Plus, this card uses the Big Shot (my FAV tool from Stampin' Up!).


These next few cards use our Spider Web embossing folder and the Big Shot machine to make that great spider web impression on the front of this card. You have to feel the image to believe it. Its fantastic!


This card uses our Kooky Spooky die for the Big Shot to make the pumpkin and the hat and the boots from our Wicked Cool stamp set and the bat comes from our new Bitty Bat punch. Don't you love the Raven black lace trim? It adds just the right touch.


 I really like how this cardmaker layered the Designer Label Punch (hmmm, maybe Concord Crush cardstock? It's hard to tell in the photo) with the new Decorative Label Punch (black cardstock) over the new Raven black lace.

What an easy and creative way to make a spider. My kids will love making this card for a few friends for Halloween this weekend.

This card uses our Top Note die and circle punches to make a Ms. Frankenstein. The bow in her hair is adorable!


This spinner card (the pumpkin spins around) uses the House of Haunts stamp set, Wicked Cool for the 'Spooky' sentiment and the photo corner punch for corner accents. Its Spooky-riffic!


Here is another card that uses House of Haunts. So colorful and creepy at the same time.

Speaking of colorful....WOW! This looks like the shaving cream technique and uses the Wicked Cool stamp set for the hat and boots and a piece of cardstock for the cape. What a wonderful illusion!

Another use for the Wicked Cool stamp set. I love the 'shadow' for the moon and the bats flying in front of it.


Here is a erie card made with the Graveyard Gala stamp set. The gravestone was stamped on Basic Gray cardstock and cut out and layered on the card base. The trees in the corner are from the Lovely as a Tree stamp set. The clouds in front of the moon look fantastic!


I had to show you this cute dresser card. They used the Spider Web embossing folder and the boots and hat from the Wicked Cool stamp set. The design on the bottom of the dresser was made with the Curly Label Punch and the drawers are cardstock with brad 'knobs' and lifted up with dimensionals. Too stinkin' cute!


Hope you enjoyed today's card samples. If you have any questions about the cards I posted, feel free to e-mail or call me. If there is something you'd like to purchase you can contact me or you can shop 24/7 on my website by clicking here.

Have a great day!
Rose-Ellen

Tuesday, October 12, 2010

Stampin' Up! Book-a-thon

Tuesday October 12th will be a busy day on the phone for me.


Stampin’ Up! has issued a challenge for us to make calls to book fun hostess events for "Girls Nights Out"! I will be calling as many of My Stamping Friends (that’s YOU!) as I can to see if they would be willing to set up dates for anytime in November, December and January! I will also be inviting you to join my team as a business builder or as someone who wants to buy their own items at a discount.

There is a fabulous Handmade Holiday 20% off Promotion for all Clients, that begins on October 19th and goes through December 16th - you won't want to miss the deals on these great Product Bundles!

You can make this "what ever" type of event you want. How about a ‘technique’ event, a Big Shot Class, a Corks and Chocolate Party, PMS (Pizza, Music and Stamping) or Power Hour Party, an Express Event that can be completed with you and your officemates during your lunch hour, EVEN a Catalog virtual party etc. BUT...it must be an event where you invite guests and I provide the class. It can be at your house, office or MY place.

If you decide that you’d like to join my team, and you join me by October 16th, you will get a FREE TOTE BAG AND A FREE STAMP SET called Eat Chocolate, that will come from the next Mini Catalog. You can check out all the details of joining my team on my website at www.roseelleneastman.stampinup.net Just click on ‘start your own business’ and use my password newrecruit to gain access to the demonstrator agreement so you can read it over.

If you answer the phone when I call and say "I LOVE RUBBER STAMPS" you will immediately WIN A PRIZE. These prizes will be given to you at your event).

If you beat me to calling you and reply to this email and book an event....You will also win a PRIZE. (Prizes will be given when your event is held).

When replying to this email, please put...."I want to BOOK a party" (or “I WANT TO JOIN YOUR TEAM”) in the subject line. You will win prizes for these bookings also......

I will be calling as many people as I can today.

Are you ready?!! Talk to you soon,

Rose-Ellen

Wednesday, October 6, 2010

How often have you thought about doing what I do?

WELL...this weekend, I attended the Stampin' Up! Baltimore Regional and they announced an incentive to JUST US in attendance, ...that for every recruit from NOW until October 16th, I can give you an extra stamp set for FREE! It's called EAT CHOCOLATE, a brand new stamp set from the upcoming 2011 mini occasions catalog. Its so secret, I can't even show you a picture of what it looks like, but I can show you some samples. TRUST ME...it's Adorable, and matches some of our punches. If you'd like to see the sample photos, let me know and I can e-mail them to you.

This FREE stamp set is IN ADDITION to the special already in place for the FREE Greenhouse Gala tote that is amazing! PLUS a discount that you can use for the next 6 months and possibly more! Anyone can buy this starter kit, and it's customizeable. You can see it on page 8 of your catalog.

Cost is 175.00...just tax, no shipping. The kit includes over 400.00 in product right now...usually only 325.00. Contact me and I can help you join right online. If you'd like to check out the details of joining my team you can visit my website and use the password newrecruit . This is a perfect time to check out what I do.

Can you imagine stamping for an income??? You can do it! Once you buy this kit you can sell the product, or just buy it at a discount for yourself. Sell your cards, run classes, and grow a fun part-time business.

Email me with any questions. Don't forget this incentive offer is only good until October 16th.

As a fun little perk, I've linked to a video of what our annual convention looks like. It is a fantastic experience that I'd love to talk to you about.


Enjoy your day, My Stamping Friends,
Rose-Ellen

Tuesday, October 5, 2010

Stampin' Up! Clearance Rack Blitz


WOW! WOW!! WOW!!!

As you know, the Stampin' Up! Clearance Rack has been operational for over a year now, and demonstrators and customers alike are finding it a great place to discover discontinued Stampin' Up! merchandise for fantastic prices. Now, from October 5-18, they are adding over two hundred more discontinued items--some at up to 80 percent off--to help make room in the Distribution Center for new products!

There are a few things you'll need to know about the Clearance Rack Blitz:

Remember that Clearance Rack merchandise needs to be ordered through my website and I can't place the order for you. The good news is that you can add non-Clearance Rack merchandise to your order. The great news is that if you're merchandise total reaches $150 you are eligible for hostess benefits and Stampin' Rewards (which translates to a free stamp set and at least $15 to spend on more merchandise).

Everything on the Clearance Rack is available while supplies last so visit my website ASAP.

All sales of discontinuted items are final.

Have a fantastic time shopping, My Stamping Friends,
Rose-Ellen

My Swap from the Stampin' Up! Baltimore Regional

Hi there My stamping Friends, The Stampin' Up! Baltimore Regional was just as much fun as I expected it to be! I learned so many new tips in the morning session that I could have left at lunch and been completely satisfied.....but WHY would I do that? And if I did that, I would have missed Glenda Travelstead's workshop which was a complete hoot. She is so funny.

I swapped out my cards as soon as I got there and have about 20+ new cards to photograph and show you. I took a bunch of photos of the display boards so I can share them as well.

Below is the final card I used for my swap. I showed you a similiar one but I changed out the layers a little (this time I tore the crumb cake rather than the night of navy) and added Smooch Pearlized Accent Ink to the star. Hope you like it.

For this card I started with a Night of Navy card base and spritzed some Smooch Spray on the front.Next I took a piece of Crumb Cake (4 x 5-1/4)  I used some Night of Navy ink and the Come to Bethlehem stamp set for the main image. I then tore the Crumb Cake layer and flipped the top part over to make a sandy hill. I sponged the edges of the crumb cake and attached it to the bottom portion with the main image. I stamped the sentiment on the Crumb Cake Layer and adhered it to the card base. I finished it off with some Smooch Pearlized Accent Ink on the star (you might only be able to see a little bit of that). Hope you like my card. Feel free to leave me a comment (hint hint) and let me know how much.

Have a great day!
Rose-Ellen

Friday, October 1, 2010

Christmas in October....

Hi there My Stamping Friends,

I can't believe my first post of October is a Christmas card, but it is. Don't worry, I LOVE Autumn and I will definitely make projects for the season, but I got this stamp set and this simple card was just calling me. Hope you like it.


I used Crumb Cake cardstock for the base. I cut a piece of Night of Navy and covered it with Vanilla Shimmer Smooch Spritz (#118772). I tore that in half on a diagonal (might as well make two cards if you're already making one). I attached it to the top left corner of the card base and then used my Come to Bethelem set (#120591-clear) with Night of Navy ink to create the main image on the bottom and the sentiment above that. As my girls would say, it was Easy Peasy.

I'm going to be working on swaps tonight and heading to the Baltimore Regional tomorrow but I'll have something to post for tomorrow so you don't miss me.

Feel free to post a comment and make my day!

Have a great weekend,
Rose-Ellen

Tuesday, September 28, 2010

Designer Fabric by Stampin' Up!

Hi there My Stamping Friends,
Check out the new video posted by Stampin' Up! Sara is showing you the new designer fabrics!

A Happy Little Accident

Hi there My Stamping Friends, Its been a while since I've posted but all my girls are back in school and it seems that the routine of school busses, snacks, homework, girlscouts, band, preschool co-oping, school volunteering, PTA meetings and Back to School Nights are all under control. Whew! Now, I can get in some more stamping time! Which is perfect because I'm going to the Stampin' Up! Baltimore Regional this weekend and I've got to get working on some swaps. My stamp studio is clean(er) and my darlin' hubby is out of town so I'll have lots of time to stay up late and get some stamping done.

Before I can show you what I've been working on for swaps, I wanted to show you a technique that isn't new, but since I've never tried it before, its new-to-me. Last weekend I was at a downline meeting hosted by my friend Robin Merriman. The cards were fantastic and there was one that I KNEW I was going to CASE as soon as I got home. I'm not sure who made the original card but if it was you, let me know and I'll give you credit here. The card used the 'dryer sheet technique'. I'll attach a photo of the card that we made at Robin's house and then I'll show you what I made at home.

Here is the beautiful card we made at Robin's house:


And here is what I made at home:


My plan was to CASE (copy the card) but change out the sentiment since I didn't have the same stamp set. Sooooooo...there I was, happily stamping with one of my clubs when my card got a little oopsie (without being reinked, the stamp touched the card stock again along the bottom of the card). Rather than flip it over and start again (which is a perfectly fine thing to do) I decided to add some more trees and make a forest. I actually like the way it turned out. As Bob Ross would say, it was a 'happy little accident'.

To create the card I first stamped the image from the Lovely as a Tree and Four the Holidays stamp sets in Night of Navy ink on Whisper White cardstock. Then I used some adhesive spray on the whisper white and placed a used dryer sheet on top of the adhesive. I trimmed my dryer sheet to the size of the whisper white layer. My dryer sheet was still pretty thick (depending on what brand you use) so I sprayed a little bit more adhesive and covered it in dazzling diamonds glittler. I put brads in the corners and used dimensionals to stick it to the night of navy card base. My Stamping Friends that were in attendace that night LOVED the card and the technique. I hope you do too. Feel free to leave a comment for me and let me know.

If you want to purchase any of the products that I just mentioned you can order directly from my website at http://www.roseelleneastman.stampinup.net/ or you can send me a note and I can answer any questions you might have.

Have a great stamping day!
Rose-Ellen

Thursday, September 9, 2010

Tote-ally Awesome Opportunity

Hi there My Stamping Friends,

I hope you are all doing well!! Things here are starting to get into a routine again since several of my wee ones have started school. The last one starts school next week and then it will be pretty quiet around my house. Not sure how I'll feel about that but I know that they love being back at school and seeing all thier school friends again.

The back to school talk got me thinking about how much I love my job with Stampin' Up! When things get a little too quiet around here I get to kick it up a notch and add a few extra events to my calendar. Thats just one of the perks of having my own business. I get to decide when I want to add more classes and workshops into my day, and right now thats just what I'm doing. I've already added two workshops for September (along with my regularly scheduled monthly events) and tomorrow I'll be adding a few more class dates on as well. I know you've been looking for the rest of the monthly Christmas Card events between now and the beginning of December! I'll also be adding Open Night back on, where you can come and bring your own projects and we can sit around the table and catch up. If you want to join us but aren't working on a project already, you'll be interested to see my card kits (more info on that when I finalize the dates.

Anyway, to get back to the reason I'm posting....If you've ever thought about starting your own business, or joining Stampin' Up! for the discount, I'd LOVE to have you join my team. From September 1st through October 18th, you'll receive a FREE craft tote - a $39.95 value - when you join Stampin' Up! This stylish and practical tote, patterned after our Greenhouse Gala Designer Series Paper and large enough to carry 12"x12" card stock and a paper cutter as well as punches, ink pads, and accessories. And with two starter kits to choose from (standard and digital) at a brand new LOWER kit price, there has never been a better time to join the Stampin' Up! family.

Check this out:


Have a great stamping day!

Rose-Ellen

Friday, August 27, 2010

Life is a Matter of Moments....

Hi there My Stamping Friends,

What a week! I'll keep it simple and say that mid-week we were celebrating some great medical test results for one of my daughters. If you're anything like me, while you're waiting for results from a test of some sort (a medical tests, an important school test, a driving test, etc) you're probably replaying bits and pieces of things in your head. Did you do everything right? How did it go? How did you get here? Sometimes time seems to stand still and sometimes time seems to fly by. For the past few days I've been watching my little ones enjoy the last few weeks of summer and am realizing how fast time is flying by.


To make this card I first used the Very Vintage wheel with Crumb Cake ink and rolled it over a piece of very vanilla card stock several times. Then I stamped over that with the Elements of Style stamp set and Soft Suede ink. I used my aqua painter with the Blushing Bride and Pear Pizzazz ink to lightly color in the flowers. I ripped around the stamped image and then sponged soft suede around the edges. I attached that image to the Soft Suede card base and stamped the sentiment on the bottom corner. I finished it up with a 'fork bow' made with the 5/8th inch very vanilla satin ribbon. All products are from Stampin' Up!

Life really is a matter of moments.....and they fly by way too quickly. Take the time to enjoy them all.


Happy Stamping,

Rose-Ellen

Tuesday, August 24, 2010

Stampin' Up! Convention - Day 4 ~July 24, 2010

Hi there My Stamping Friends,

Just a final post about the Stampin' Up! Convention 2010. We started off the morning with a special treat of Shelli and her daughter Sara on stage talking all about the Stampin' Up! fabric. Yup, you heard me.....Stampin' Up! fabric. It MATCHES our designer series paper. How cool is that. You can use it as fabric or put it on cards or scrapbook pages. Its sooooo cool in real life. Can't wait to show it to you!


Here is a cute Christmas tree that they showed to us. It is made from bits of ripped fabric and makes a great tree ornament.


Here I am with my friend Robin Merriman on the left (who was chosen to serve again on the company's National Advisory Board; a group of only 8 demonstrators company-wide. I'm so happy for you my friend!) and my new friend Kimberly Van Diepen on the right. Kimberly moved relatively close to me and sounds like so much fun. Hopefully we'll get to stamp together soon.


Our final dinner was at a Brazilian Steakhouse. YUMMO!!! Mandy and I totally skipped the salad bar and went straight for a taste of every piece of meat they offered. It was a great way to try some new items and I really liked most of them (those that know me are surprised by what I just wrote). This photo has (L to R) Jackie, Julie, Dina, Mandy standing up in pink, Amanda, the server, then me, Kasey and Cathy. It was so much fun Ladies. Thanks!!


Here is my last view before heading home. It was a great trip but I'm ready to see my 4 little munchkins and my darlin hubby. Missed them all terribly.


Finally, I'll finish off with some photos of cards that I saw on the sample boards or from swaps. I have no idea who made these cards so if it was you just let me know and I'll give you credit.
This card was made with our decor stencil Folk Flowers and the Oval All stamp set. Great job.

This cheery card uses our Greenhouse Gala Designer Series Paper, Friends Never Fade stamp set and our Square Lattice embossing folder with the Big Shot.

Check out this beautiful lanter that I saw. Just fantastic.

This card uses the Big Shot, the Daisies #2 flowers Die, the Build a Brad and our Inspired by Nature stamp set to name a few things.

I LOVE this one because we are about to take a family celebration trip to Hawaii and I was thinking of making a few of these and handing them out while I am there.


I hope you all have a great Stamping day.
Rose-Ellen