Showing posts with label Lovely as a Tree. Show all posts

Wednesday, January 9, 2013

Stampin' Up! Holiday cards and Christmas Projects for 2012 (part three)

Greetings My Stamping Friends,

I'm finally getting to share a spinner card I made several weeks ago. I used the Stampin' Up! Ornament Keepsakes stamp set and the Holiday Ornaments framelits die. The sentiment is from More Merry Messages and I used the tree from Lovely as a Tree as the branch. There is a small piece of thread (or you can use fishing line) to get the ornament to 'float' in the opening. Before you close the card you should spin the ornament and close the card quickly.  That way, when the receiver actually opens the card, the ornament will spin for them. It definately gets lots of Ooohs and Aaahs.
 
Stampin' Up! Ornament Keepsakes stamp set and the Holiday Ornaments framelits die. The sentiment is from More Merry Messages and I used the tree from Lovely as a Tree as the branch.
 
Stampin' Up! Ornament Keepsakes stamp set and the Holiday Ornaments framelits die. The sentiment
 is from More Merry Messages and I used the tree from Lovely as a Tree as the branch.
 
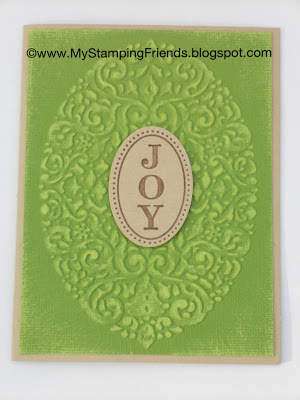
A joyful wreath card made with the Holiday Frame embossing folder and the coredinations card stock.
I used the JOY sentiment from the Joyous Celebrations stamp set from Stampin' Up!
 
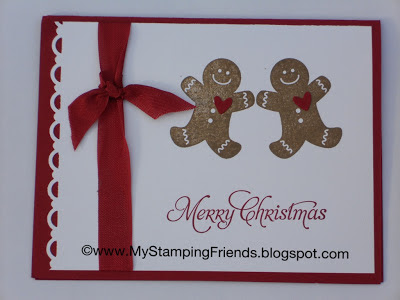
Friendly gingerbread people made with the Scentsational Seasons stamp set. Their hearts were made with the owl builder punch and the scallop was cut with the scallop trim border punch.
 
 
A CASE using the pointesettias from the Watercolor Winter stamp set
and a sentiment from More Merry Messages.

I hope you enjoyed the final post of my holiday and Christmas cards from 2012. Now I can move on to all the exciting things going on in Orlando, FL for the Stampin' Up! leadership meeting. Can't wait to share all the fun things that are starting tomorrow at check in. 

Stay Tuned,
Rose-Ellen


Stampin' Up! Holiday cards and Christmas Projects for 2012 (part two)

Howdy Stampin' Friends, Here are a few more of my Stampin' Up! Christmas and Holiday projects.

Stampin' Up!'s Come to Bethlehem on crumbcake, a layer of midnight muse cut with the
 labels collection  framelits for the Big Shot, and layered on crumb cake that was run through
 the Big Shot with the fancy fan embossing folder.
 
A Christmas ornament stamped with the Ornament Keepsakes stamp set and cut with
Holiday Ornaments framelits dies. The ornament is hanging from a branch made with Lovely as a Tree.
The sentiment is from More Merry Messages.
 
A snowman giftbag made with the Top Note die and punches.
 
A string of holiday ornaments stamped with the Ornament Keepsakes stamp set and cut out on the
 Big Shot with Holiday Ornaments framelits dies. The ornaments are hanging from bakers twine
and the sentiment is from More Merry Messages.
 
A snowman gift tag made with lots of different punches and
 inspired from something I saw on Pinterest.
 
Enjoy,
Rose-Ellen

Monday, November 29, 2010

In like a lion.....

Hi there My Stamping Friends,

For me it seems like the Holiday season 'comes in like a lion'. I'm not really sure where summer went and now we're already past Thanskgiving and we're gearing up for Christmas. WOW!!!

Well, December for me means making LOTS of Christmas Cards. I've been making a few at a time for the last several months but I still have a bunch more to go. This is a card that I created after seeing so many different versions on Stampin' Connection (which is sort of a version of FaceBook for Stampin' Up! demonstrators~and you can have access within moments if you purchase the $300+ kit on sale now for less than $88). Thanks to all my fellow demonstrators for the inspiration.


The base of this card is cherry cobbler. I used the Big Shot to cut out a top note die from confetti cream cardstock. The tree branches were made using Lovely as a Tree with old olive ink and the sentiment was stamped in cherry cobbler using Four The Holidays. The strip of DSP and the ornament was punched from papers from the Jolly Holiday pack. I used the silver tinsel as an ornament hook and wrapped one end around the ornament and put the other end through the top note die so it looks like its hanging on a branch. It might looke like a complicated card but it wasn't at all.

If you want to purchase any of the items needed to make this card you can visit my website at http://www.roseelleneastman.stampinup.net/ or you can email or call me.

Tuesday, September 28, 2010

A Happy Little Accident

Hi there My Stamping Friends, Its been a while since I've posted but all my girls are back in school and it seems that the routine of school busses, snacks, homework, girlscouts, band, preschool co-oping, school volunteering, PTA meetings and Back to School Nights are all under control. Whew! Now, I can get in some more stamping time! Which is perfect because I'm going to the Stampin' Up! Baltimore Regional this weekend and I've got to get working on some swaps. My stamp studio is clean(er) and my darlin' hubby is out of town so I'll have lots of time to stay up late and get some stamping done.

Before I can show you what I've been working on for swaps, I wanted to show you a technique that isn't new, but since I've never tried it before, its new-to-me. Last weekend I was at a downline meeting hosted by my friend Robin Merriman. The cards were fantastic and there was one that I KNEW I was going to CASE as soon as I got home. I'm not sure who made the original card but if it was you, let me know and I'll give you credit here. The card used the 'dryer sheet technique'. I'll attach a photo of the card that we made at Robin's house and then I'll show you what I made at home.

Here is the beautiful card we made at Robin's house:


And here is what I made at home:


My plan was to CASE (copy the card) but change out the sentiment since I didn't have the same stamp set. Sooooooo...there I was, happily stamping with one of my clubs when my card got a little oopsie (without being reinked, the stamp touched the card stock again along the bottom of the card). Rather than flip it over and start again (which is a perfectly fine thing to do) I decided to add some more trees and make a forest. I actually like the way it turned out. As Bob Ross would say, it was a 'happy little accident'.

To create the card I first stamped the image from the Lovely as a Tree and Four the Holidays stamp sets in Night of Navy ink on Whisper White cardstock. Then I used some adhesive spray on the whisper white and placed a used dryer sheet on top of the adhesive. I trimmed my dryer sheet to the size of the whisper white layer. My dryer sheet was still pretty thick (depending on what brand you use) so I sprayed a little bit more adhesive and covered it in dazzling diamonds glittler. I put brads in the corners and used dimensionals to stick it to the night of navy card base. My Stamping Friends that were in attendace that night LOVED the card and the technique. I hope you do too. Feel free to leave a comment for me and let me know.

If you want to purchase any of the products that I just mentioned you can order directly from my website at http://www.roseelleneastman.stampinup.net/ or you can send me a note and I can answer any questions you might have.

Have a great stamping day!
Rose-Ellen