Showing posts with label embossing folder. Show all posts

Monday, November 25, 2013

Creations made with the Stampin' Up! Gift Bow Bigz Die

Howdy My Stamping Friends, Happy Thanksgiving Week to you! I've been working on some Christmas Cards for my club meeting and some Stamp-A-Stack cards for next week, but today I'm sharing some fun things I made with the Stampin' Up! Gift Bow Bigz Die.

A few weeks ago, I had the wonderful honor to present at Christina Crawford's team meeting with my friend Sharon Cline. It was so fun chatting with and getting to know these ladies and sharing a few things I've made with the Stampin' Up! Gift Bow Bigz Die.

First, I showed them the regular bow that can be made, using some designer series paper. This bow can be used to create some awesome gift packaging.  Then I showed them some other uses for the bow.

I showed them how they could use the bow die on some greeting cards. And depending on which designer series paper you use for the bow, you can make it feminine or masculine. You can make these cards for any occasion such as Mothers Day, Father's Day, birthdays or any celebration. I've showed you these before, in this post, but here are a few more.
#card perfect for Birthday, Mothers Day, Fathers Day, Thanksgiving or
Any Celebration, using #StampinUp Gift Bow die and #PerfectlyPenned
stamp set #MyStampingFriends

I made these with the Brights Color Collection Designer Series Paper Stack, using Pumpkin Pie and Tempting Turquoise, and I got the sentiments from Perfectly Penned Stamp set.

Next I showed them how to make another card, one that looks like a wrapped gift box. For this one I used the polka dot pattern from the Season of Style Designer Series Paper Stack and the Holly Jolly stamp from Tags 4 You, punched out with the coordinating Label Bracket Punch. What do you think?
#card perfect for Birthday, Mothers Day, Fathers Day, #Thanksgiving , #Christmas
or Any Celebration, using #StampinUp Tags 4 U stampset and Label Bracket Punch
stamp set #MyStampingFriends

Then I explained how I made this super adorable wedding card by running the cut out bow pieces through different embossing folders. It's hard to see but the black bow was run through the Stripes embossing folder and the white bow was run through the retired Lacy Brocade embossing folder. I also embossed the front layer of the card and then attached the bows to the front layer. I embellished with some basic pearls and added a sentiment from Teeny Tiny Wishes cut out with the modern label punch. I LOVE this card!
#wedding #card perfect for the big day, can be changed to a Prom card by changing
the sentiment, using #StampinUp Gift Bow die and #TeenyTinyWishes, embossing folder
 #stripes, #LacyBrocate #MyStampingFriends
Next I described how I made this fantastic napkin ring. I used the small bow from the die and made the loop to go around the napkin. Next I used the Holly Jolly stamp from Tags 4 You and the Label Bracket punch to create the sentiment. Finally I used the Artisan Label Punch to cut a piece of the silver glimmer paper. I cut that punched shape in half and attached it to the back of the sentiment, and I attached that whole piece to the front of the bow/loop/napkin ring. Here are two views so you can see the front and the bow/loop/ring part.
#napkinring perfect for #Birthday, #Mothers Day, #Fathers Day, #Thanksgiving
#Christmas or Any Celebration, using #StampinUp Gift Bow die and #Tags4You
stamp set #MyStampingFriends

#napkinring perfect for #Birthday, #Mothers Day, #Fathers Day, #Thanksgiving
#Christmas or Any Celebration, using #StampinUp Gift Bow die and #Tags4You
stamp set #MyStampingFriends
I also explained how to make this neat pair of sunglasses that are just perfect for a summertime scrapbook layout. I cut some Brights Color Collection Designer Series Paper Stack with the largest bow on the die. Then I cut some black paper using the small bow on the die. I stuck the ends of the black piece of the bow into the mosaic punch to get the fancy edge of the 'glasses/frame'.  Super simple and you can write some notes about your layout with the White Chalk Marker. Coolio!
#sunglasses perfect for #scrapbook, #summerBirthdays, and #Vacation
 using #StampinUp Gift Bow die and Mosaic Punch #MyStampingFriends

I ended the demonstration with a WOW project of Tom the Turkey made with the Gift Bow Bigz Die. I've showed him to you on my facebook page ( www.facebook.com/StampinUpWithRoseEllen ). He wasn't my original idea but he's sooooo super cute that I just couldn't leave him out. I saw him on Facebook from a photo a friend of mine took while she was at a team meeting in Philadelphia so I don't even know the name of the person that actually made him in Philly. Anyway I HAD to give him a try and this is what I ended up with. Isn't he just adorable!! He'll be sitting on my table for the Thanksgiving holiday!
#TomTheTurkey #Tablescape perfect for #Thanksgiving
using #StampinUp Gift Bow die #MyStampingFriends

Do you have the Stampin' Up! Gift Bow Bigz Die? If so, I'd love to know what have you been creating with it. If you don't have it yet, feel free to hop on over to my website and purchase it. If you shop there before December 8th you can use Hostess Code C34MRFU7.

Thanks for visiting,
Rose-Ellen

StampingWithRose-Ellen@cox.net
Shop 24/7:  www.RoseEllenEastman.StampinUp.net
Facebook:  Stampin' Up! With Rose-Ellen
Twitter: @REEastman
Pinterest: Rose-Ellen Eastman
Instagram: MyStampingFriends

Wednesday, September 26, 2012

A Fall Birthday card using Stampin' Up!'s Core'dinations cardstock, Sanding System and the Big Shot

Wow, I can't believe it's been sooooo long since I've posted. The end of summer was so busy with my little lasses and traveling that I was just enjoying my time with them before they all went off to school.  But that doesn't mean I wasn't stamping....I just wasn't blogging. Now that they are all at school, I've been enjoying my time in my craft room and here I am to post a project from the other day.

Yesterday was my darling hubby's birthday and he had to go on a business trip. I only got to see him for a few moments that morning but I had to make sure he had a card before he left on his trip. So, I made this card and had the girls sign it for him before they went to bed just so it was ready and waiting for him in the morning.

Stampin' Up!'s Tweet Leaves and Core'dination card stock make a fantastic birthday card
So, what do you think? I started with a Stampin' Up! crumb cake base and a layer of the new Core'dinations card stock in Early Espresso. I ran that through the big shot using the new Woodgrain textured embossing folder. I sanded with the Stampin' Sanding Block and was completlely blown away by the awesome Core'dinations Dust Buddy as it picked up every piece of dust and debris I made using the sanding system. I then wrapped a piece of Pool Party Seam Binding around that layer. I went back to my beloved Big Shot and cut out the largest leaf using the Autumn Accents Bigz Die. I markered the Tweet Leaves stamp and put my image directly on the leaf that I cut out and then I adhered it to the card layer with Stampin' Dimensionals. I finished up the card with a sentiment from Teeny Tiny Wishes cut out and layered with the Word Window Punch and the Modern Label Punch.

My hubby loved the card. What about you? Feel free to leave me some love in the comment section and then have a fantastic day.

Rose-Ellen

Thursday, October 28, 2010

Halloween Card Samples from the Stampin' Up! Baltimore Regional Seminar

Hi there My Stamping Friends, I'm sorry its been so long since I've posted. I've been busy booking workshops and showing my hostesses what to do to have the best party they can have.

Today I thought I'd post some photos from the Baltimore Regional. I got some of them from swapping, some are photos from cards that I liked and some are from the sample boards. I don't know who made all the cards, but if I have thier name I'll give them credit. If you're visiting my blog and you see one of your cards, let me know and I'll post your name and give you credit.

Here are some of my favorite mostly-Halloween cards from the Baltimore Regional:

I LOVE LOVE LOVE this one. What a great 'out of the box' card to give a couple for thier wedding. I can see using their wedding colors or even a little monogram on the towels. Very cute!! Plus, this card uses the Big Shot (my FAV tool from Stampin' Up!).


These next few cards use our Spider Web embossing folder and the Big Shot machine to make that great spider web impression on the front of this card. You have to feel the image to believe it. Its fantastic!


This card uses our Kooky Spooky die for the Big Shot to make the pumpkin and the hat and the boots from our Wicked Cool stamp set and the bat comes from our new Bitty Bat punch. Don't you love the Raven black lace trim? It adds just the right touch.


 I really like how this cardmaker layered the Designer Label Punch (hmmm, maybe Concord Crush cardstock? It's hard to tell in the photo) with the new Decorative Label Punch (black cardstock) over the new Raven black lace.

What an easy and creative way to make a spider. My kids will love making this card for a few friends for Halloween this weekend.

This card uses our Top Note die and circle punches to make a Ms. Frankenstein. The bow in her hair is adorable!


This spinner card (the pumpkin spins around) uses the House of Haunts stamp set, Wicked Cool for the 'Spooky' sentiment and the photo corner punch for corner accents. Its Spooky-riffic!


Here is another card that uses House of Haunts. So colorful and creepy at the same time.

Speaking of colorful....WOW! This looks like the shaving cream technique and uses the Wicked Cool stamp set for the hat and boots and a piece of cardstock for the cape. What a wonderful illusion!

Another use for the Wicked Cool stamp set. I love the 'shadow' for the moon and the bats flying in front of it.


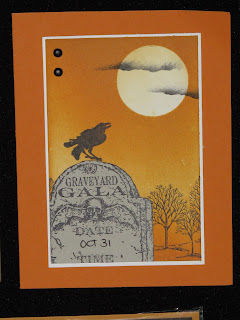
Here is a erie card made with the Graveyard Gala stamp set. The gravestone was stamped on Basic Gray cardstock and cut out and layered on the card base. The trees in the corner are from the Lovely as a Tree stamp set. The clouds in front of the moon look fantastic!


I had to show you this cute dresser card. They used the Spider Web embossing folder and the boots and hat from the Wicked Cool stamp set. The design on the bottom of the dresser was made with the Curly Label Punch and the drawers are cardstock with brad 'knobs' and lifted up with dimensionals. Too stinkin' cute!


Hope you enjoyed today's card samples. If you have any questions about the cards I posted, feel free to e-mail or call me. If there is something you'd like to purchase you can contact me or you can shop 24/7 on my website by clicking here.

Have a great day!
Rose-Ellen