Hi there My Stamping Friends, I've added a few new get-togethers to the calendar in the next week and wanted to make sure everyone saw it. I hope you can come stamp with us so here are the details:
I’ve had several people ask me to re-do the Kids Valentine class on a weeknight or weekend so here it is. All the details for the cards are in another post here but there is some additional info is below:
Who: Anyone that wants to stamp Valentine’s Day Cards with their kids
What: Valentine Class – 1 mailbox, 5 3x3 cards and matching envelopes. Details and photos of the add-on options are here.
Where: Falls Church, VA– I can give you details and directions when you RSVP
When: THIS SUNDAY 2/6/11 from 1pm until 3pm RSVP’s needed so I can have your papers prepared.
Why: A chance to spend some fun time with the kids before the ball game starts
I am adding two card classes for adults next week. They will be:
Thursday, Feb 10th from 6:30 to 8:30 MEETUP at El Tio Tex Mex Grill in Falls Church, VA. This is a special FREE CLASS and is great for beginners that haven’t ever stamped before & people looking to have some fun with their friends. You will make 2 regular sized simple greeting cards (one Valentine and one general greeting card that you can customize with a sentiment of your choosing). No one needs to bring any crafting supplies to this event. I’ll have all of that with me. I will need RSVPs at 703-200-2340 or at StampingWithRose-Ellen@cox.net by late Wednesday night (midnight or so) so I can make sure to have enough paper supplies with me at the event. Once you’re done with your cards, free to stay, order some dinner and drinks and socialize for a while.
And
Friday, Feb 11th from 7:30 to 9:00 at my place. This is a repeat of my monthly card class. No stamping/crafting/scrapbooking/paper crafting experience is necessary! Come over and I’ll show you how to make six simple all occasion/general greeting cards. You’ll make all six different cards and coordinating envelopes for only $15. If you place a $20 order, your class will be free!! Bring a guest that is new to me and get a gift from me. Invite me to come show you and your friends how to stamp and get a gift from me. Please RSVP to 703-200-2340 by Thursday evening 2/10/11 so I will have enough supplies prepared for everyone.
Don’t forget that we are having our annual Sale-A-Bration promotion: That means you can earn free product for every $50 you spend. If you hostess a qualifying party you will get free product in addition to the free items you earn for the merchandise sold at your party. Or, join my team with Stampin’ Up! and you’ll get and extra $50 in free product!!
If you want to order any product that I've mentioned here or that you've seen in my cards you can contact me or order 24/7 online by visiting my website at http://www.roseelleneastman.stampinup.net/
Have a fantastic day!
Rose-Ellen
Saturday, February 5, 2011
Monday, January 31, 2011
Kid's Valentine Day Card Class
Good Morning My Stamping Friends, I wanted to let you know that I still have spots left in my Kids Valentines Day Card Class. I was going to do a small Stampin' Up! class for a few of my local friends that were asking to stamp Valentines Cards with their children but more and more people mentioned they were interested so I've turned it into a full class at my house. It will be held at my house and I still have spots left. Here are the details:
Who: Everyone is invited to come and stamp with your children. My girls have the day off school so they'll be here stamping and helping too (or watching a movie in the playroom).
What: Kid's Valentines Card Class - The class comes with ONE mailbox (the photo shows three, but when you RSVP you'll need to let me know if you want red, white or pink; I don't have many pink left so RSVP fast, first come first served) and FIVE 3x3square cards and matching envelopes that are in the photo with the mailbox. These cards are great for anyone from preschoolers and up. The cards are clean and simple and are made with line art stamps so your child can color them and can add faces onto the 'monster' stamps.
Cost: The class costs $5 for the mailbox and the five cards and matching envelopes.
Where: My House in Falls Church, VA (call for directions if you need them)
When: Tuesday, February 1, 2011. 9:30- 11:30 and 1:00 to 4:00. You'll probably need about 30 minutes to stamp the cards from the class so come over anytime during the open hours but make sure you have enough time to stamp.
Why: Valentines Cards are great to give to friends, family, classmates, teachers, members of your congregation, neighbors and......anyone that you'd like.

You can add on another set of the five class cards and envelopes for $3 per set. You can choose to do the same cards in the class or you can add on the cards from Option 2 or Option 3. At this point the class is not full so if you are going to choose to add on another set of cards, you may choose to select a certain card and make multiples of that one. Please let me know that in your RSVP.


Please RSVP by 10 pm Monday night so I can have your papers cut and ready for you when you arrive on Tuesday.
When you RSVP I will need to know:
Call me at 703-200-2340 or email me at StampingWithRose-Ellen@cox.net with any questions and have a fantastic day!
Rose-Ellen
Who: Everyone is invited to come and stamp with your children. My girls have the day off school so they'll be here stamping and helping too (or watching a movie in the playroom).
What: Kid's Valentines Card Class - The class comes with ONE mailbox (the photo shows three, but when you RSVP you'll need to let me know if you want red, white or pink; I don't have many pink left so RSVP fast, first come first served) and FIVE 3x3square cards and matching envelopes that are in the photo with the mailbox. These cards are great for anyone from preschoolers and up. The cards are clean and simple and are made with line art stamps so your child can color them and can add faces onto the 'monster' stamps.
Cost: The class costs $5 for the mailbox and the five cards and matching envelopes.
Where: My House in Falls Church, VA (call for directions if you need them)
When: Tuesday, February 1, 2011. 9:30- 11:30 and 1:00 to 4:00. You'll probably need about 30 minutes to stamp the cards from the class so come over anytime during the open hours but make sure you have enough time to stamp.
Why: Valentines Cards are great to give to friends, family, classmates, teachers, members of your congregation, neighbors and......anyone that you'd like.
These are the cards we'll be making in the Valentine Card Class on Tuesday.

Class Add-Ons:
You can add on another set of the five class cards and envelopes for $3 per set. You can choose to do the same cards in the class or you can add on the cards from Option 2 or Option 3. At this point the class is not full so if you are going to choose to add on another set of cards, you may choose to select a certain card and make multiples of that one. Please let me know that in your RSVP.
The cards below are from the Add-On Option #2

The cards below are from the Add-On Option #3

Please RSVP by 10 pm Monday night so I can have your papers cut and ready for you when you arrive on Tuesday.
When you RSVP I will need to know:
- How many children are coming to the class
- What color mailboxes they would like
- If there will be any add-ons and how many
- A general idea of what time you'll be coming over on Tuesday.
Call me at 703-200-2340 or email me at StampingWithRose-Ellen@cox.net with any questions and have a fantastic day!
Rose-Ellen
Thursday, January 27, 2011
SALE-A-BRATION IS HERE!!!!
Hi there My Stamping Friends,
Can you believe it? I'm so excited! Its FINALLY time for SALE-A-BRATION. I know you've been waiting just as long as I have so I thought I'd post some details.
Every year Stampin' Up! gives customers, hostesses, and new demonstrators the opportunity to earn fantastic, FREE, limited-edition products they'll enjoy for years to come.
Here's how Sale-A-Bration works:
Spend : When you spend $50 on Stampin' Up! merchandise, you'll receive a free Sale-A-Bration reward. There's no limit--for every $50 you spend, you can select another FREE Sale-A-Bration reward!
Host: When you host a workshop of at least $300 (before tax and shipping), you'll receive a free Sale-A-Bration reward in addition to all of the regular hostess benefits! I still have some dates available so contact me today to schedule your Sale-A-Bration workshop
Join: During Sale-A-Bration, anyone who joins as a demonstrator gets 15 percent off the price of the standard or Digital+ Starter Kits--that's over $310 worth of high-quality Stampin' Up! products for just $148.75! In addition, new demonstrators get a FREE Bonus Bundle worth up to $50! To take advantage of this special, limited-time offer, contact me today.
Here are a few cards made with the set called Bliss:


Have a great day and I'll chat with you tomorrow.
Rose-Ellen
Can you believe it? I'm so excited! Its FINALLY time for SALE-A-BRATION. I know you've been waiting just as long as I have so I thought I'd post some details.
Every year Stampin' Up! gives customers, hostesses, and new demonstrators the opportunity to earn fantastic, FREE, limited-edition products they'll enjoy for years to come.
Here's how Sale-A-Bration works:
Spend : When you spend $50 on Stampin' Up! merchandise, you'll receive a free Sale-A-Bration reward. There's no limit--for every $50 you spend, you can select another FREE Sale-A-Bration reward!
Host: When you host a workshop of at least $300 (before tax and shipping), you'll receive a free Sale-A-Bration reward in addition to all of the regular hostess benefits! I still have some dates available so contact me today to schedule your Sale-A-Bration workshop
Join: During Sale-A-Bration, anyone who joins as a demonstrator gets 15 percent off the price of the standard or Digital+ Starter Kits--that's over $310 worth of high-quality Stampin' Up! products for just $148.75! In addition, new demonstrators get a FREE Bonus Bundle worth up to $50! To take advantage of this special, limited-time offer, contact me today.
Here are a few cards made with the set called Bliss:

121851 Bliss stamp set
119685 Cherry Cobbler Card stock
100730 Whisper white card stock
121045 Basic Black card stock
101179 Basic black ink
119877 1 3/8 inch square punch
119859 extra large oval punch
119262 white narrow taffeta ribbon
119246 Basic rhinestones
104430 dimensionals

121851 Bliss stamp set
115060 Short and Sweet stamp set
108640 River Rock Card stock
119686 Early Espresso Card stock
101650 Very Vanilla card stock
119670 Early Espresso ink
stampin' sponges
121809 framed tulips embossing folder
119740 Bold Bright brads
Have a great day and I'll chat with you tomorrow.
Rose-Ellen
Sunday, January 23, 2011
I LOVE LOVE LOVE the Stampin' Up! Petal Cone Die for the BigShot
Hi there My Stamping Friends, I can't believe its been a week since I last posted. I was in Nashville, TN for the Stampin' Up! Leadership Conference and our few days were jam-packed with things to do from 7:30am until 10pm. I had a fabulous time, as always, and will tell you all about that in some of my upcoming posts.
Today's post is going to be about Stampin' Up!'s Petal Cone die for the Big Shot. I can't tell you how much I LOVE this die. I was planning on demonstrating this die at my friend Robin Merriman's team meeting on Saturday so I sat down to play with it on Friday in order to have some samples to pass around (Thanks for having me demonstrate Robin, it was a blast!!). The first thing I was planning on making was a carrot (I was sitting with my friend Selene at Leadership during the petal cone presentation and noticed that it looked just like a carrot-can't wait till Easter now) but before I made a carrot (which I ended up not even doing) I searched the internet to see what some amazingly talented stampers did with this die. Then once I had all these ideas/options in my head I sat down to see what I could do. So, here is one large thank you to everyone that posts thier creative ideas on the web. I hope someone gets inspired by what I post as well. Enjoy!
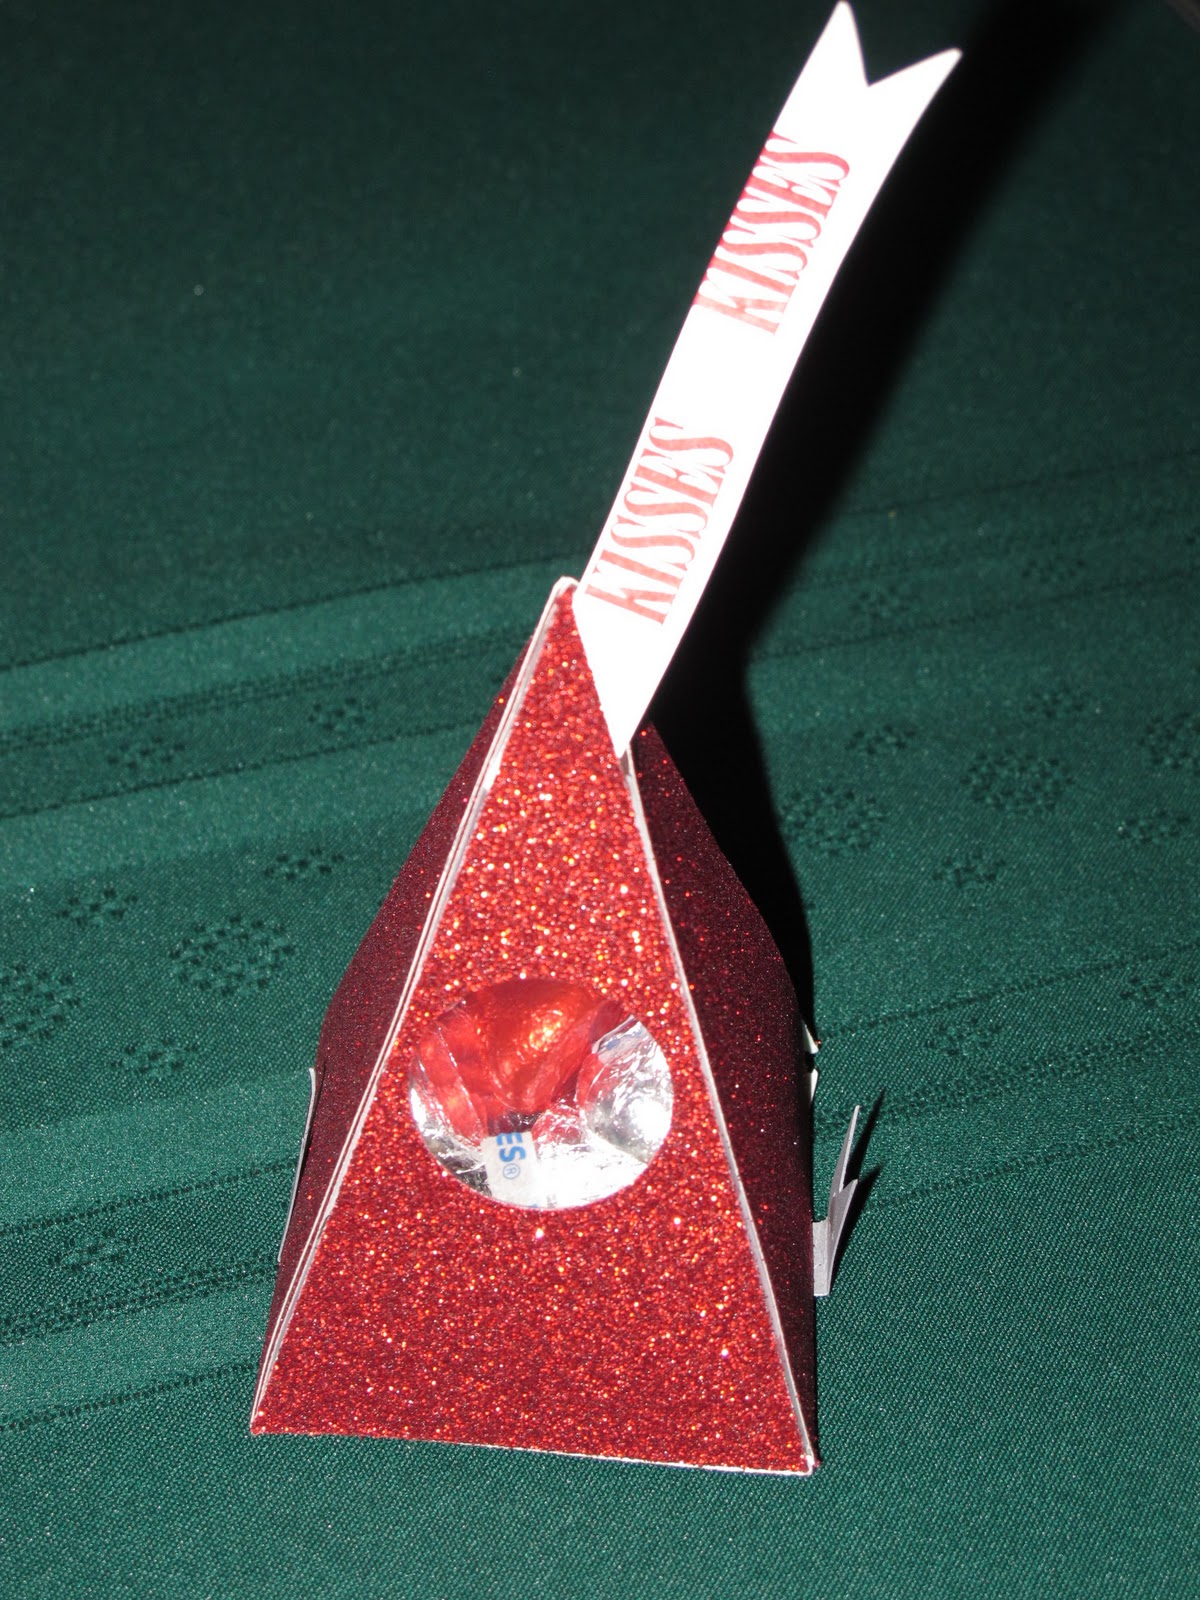
This is my version of what we saw presented at General Session during Leadership 2011. I used the new Glitter Paper and added the Kisses Tag to make it look like a Hershey Kiss. If we had silver glitter paper you KNOW I would have used that.


I hope you enjoyed the samples I made (I love to read the comments you leave so feel free). I had a ton of fun making them. Tomorrow I'll post about some of the fun things we did at Leadership2011 in Nashville last week.
Rose-Ellen
Today's post is going to be about Stampin' Up!'s Petal Cone die for the Big Shot. I can't tell you how much I LOVE this die. I was planning on demonstrating this die at my friend Robin Merriman's team meeting on Saturday so I sat down to play with it on Friday in order to have some samples to pass around (Thanks for having me demonstrate Robin, it was a blast!!). The first thing I was planning on making was a carrot (I was sitting with my friend Selene at Leadership during the petal cone presentation and noticed that it looked just like a carrot-can't wait till Easter now) but before I made a carrot (which I ended up not even doing) I searched the internet to see what some amazingly talented stampers did with this die. Then once I had all these ideas/options in my head I sat down to see what I could do. So, here is one large thank you to everyone that posts thier creative ideas on the web. I hope someone gets inspired by what I post as well. Enjoy!
This is my version of what we saw presented at General Session during Leadership 2011. I used the new Glitter Paper and added the Kisses Tag to make it look like a Hershey Kiss. If we had silver glitter paper you KNOW I would have used that.
Here are wo different candy dishes made with DSP. They were so simple to make and can be made to coordinate with any party decor! Love it!

Here is a traditional cone made with Crumb Cake and Chocolate Chip cardstock and stamped with the Eat Chocolate stamp set.
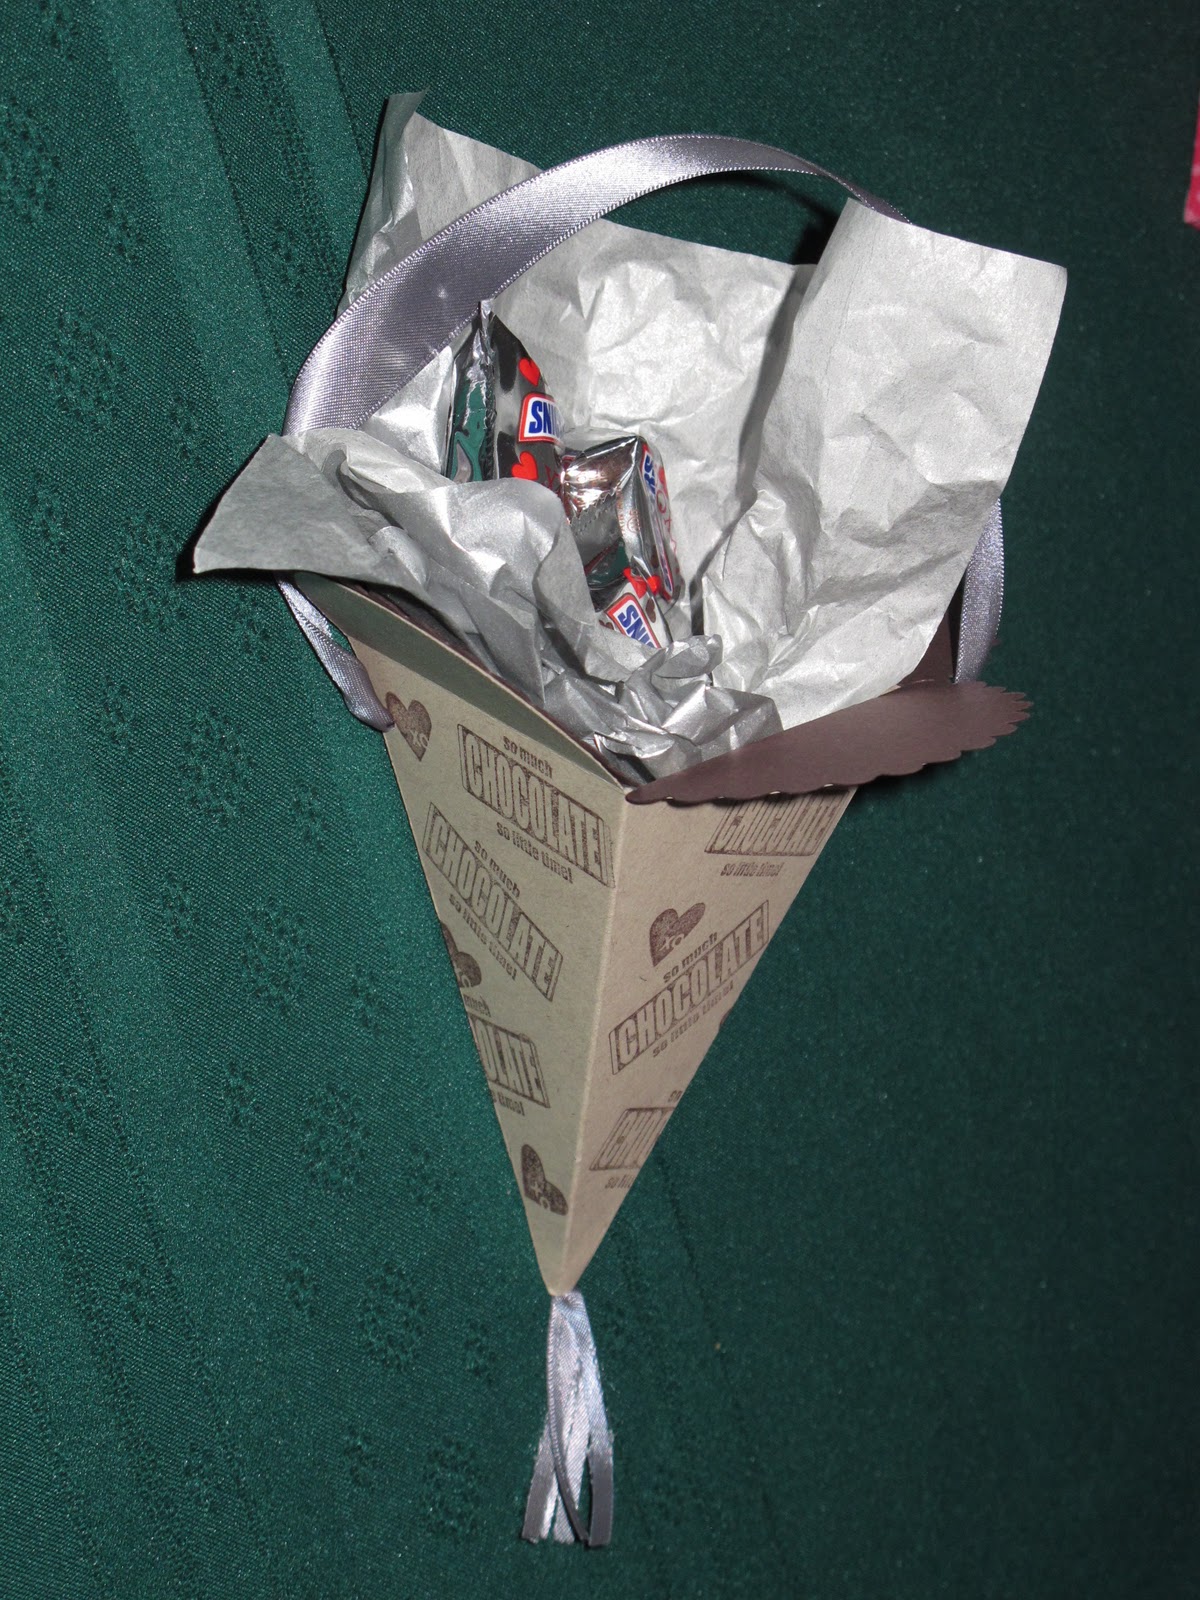
This traditional cone was made with DSP. I used the XOXO stamp set to decorate the tissue paper to coordiante with the theme. Since I stamped Hugs and Kisses, I filled it withe Hershey's Hugs and Kisses.

This is just an idea for an ice cream cone shape that can be used as a birthday party or ice cream party invitation or thank you note.

This is what the inside of the ice cream note looks like. Let me know if you want more detilas or more photos. It was really easy to put together.

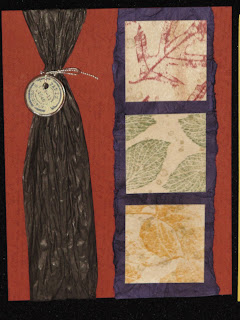
This next one is my favorite and was a hit at Robin's team meeting. I cut the petal cone and attached it together in the back. I cut the tab off the front side and used it as a card that opens in the center. The problem was that I couldn't get the card to stay 'closed' soooooo....I used the full heart punch to punch out two hearts. I attached one to the left front side of the card and the attached the other heart to the inside of the card leaving a little slot for the right side of the card to slide into (did that make sense?).

Here is a photo of the Basic Gray heart closure in case I didn't explain that well enough.

Here is a photo of the inside. I spritzed it with 3 different colors in homage to Shelli Gardner, the owner and co-founder of Stampin' Up! She loves the vintage look.

I hope you enjoyed the samples I made (I love to read the comments you leave so feel free). I had a ton of fun making them. Tomorrow I'll post about some of the fun things we did at Leadership2011 in Nashville last week.
Rose-Ellen
Thursday, January 13, 2011
My first swap at Stampin' Up!'s Leadership 2011

Enjoy,
Rose-Ellen
Wednesday, January 5, 2011
Merry Christmas and Happy New Year
Hi there My Stamping Friends! I hope you all had a wonderful holiday season. We certainly did. We have lots to be thankful for and lots to celebrate this Christmas. The girls went back to school Monday after a long winters break and the transition wasn't easy....for me. I have to admit that they got up and got ready without any complaining. I think they were ready to go back and catch up with friends. I, on the other hand, felt like whining from the minute my alarm clock went off. I was not ready to get back into the routine. But now I am and one of my resolutions this year is to be more organized, in everything. I really think that will give me more time for different things. So now its time its time to start posting on a regular basis again.
Before I go on to show you my card I want to remind you that THE NEW MINI CATALOG IS HERE. You should have received one in the mail (if you didn't, please let me know and I'll get one to you right away). My package of goodies should arrive on Thursday night so I'll post new things in a few days.
I will catch up with posting my current projects, but for now I'll show you the Stampin' Up! Christmas card I made this year.
 I used a Cherry Cobbler card base and stamped snowflakes from Serene Snowflakes in Cherry Cobbler onto a piece of very vanilla. I stamped Merry Christmas from Teeny Tiny Wishes and punched it with the modern label punch and layered it on the decorative label punch. I wrapped a piece of cherry cobbler seam binding around the whispter white layer and attached that to the base. I used dimensionals to attach the cherry cobbler punch shape to the card and I was done. It was actually pretty quick to whip out 100+ of these.
If you want to purchase any of the Stampin' Up! products mentioned here please feel free to contact me at 703-200-2340 or via email at my e-mail address StampingWithRose-Ellen@cox.net
Enjoy the card and tomorrow I'll post one of the other two cards I sent out.
Rose-Ellen
Before I go on to show you my card I want to remind you that THE NEW MINI CATALOG IS HERE. You should have received one in the mail (if you didn't, please let me know and I'll get one to you right away). My package of goodies should arrive on Thursday night so I'll post new things in a few days.
I will catch up with posting my current projects, but for now I'll show you the Stampin' Up! Christmas card I made this year.

If you want to purchase any of the Stampin' Up! products mentioned here please feel free to contact me at 703-200-2340 or via email at my e-mail address StampingWithRose-Ellen@cox.net
Enjoy the card and tomorrow I'll post one of the other two cards I sent out.
Rose-Ellen
Tuesday, December 7, 2010
Holiday Stamp A Stacks - Spots still available
Hi there My Stamping Friends,
I wanted to let you know that I still have space in some of my Holiday Stamp a Stacks. If you haven't heard, the schedule is as follows:
Please RSVP by December 1st so I have supplies prepared for each participant.
** You can feel free to leave the sentiment off and change them into general holiday cards.
Wednesday Dec 8, 2010 at 10am-11:30am Stamp-A-Stack #1 (daytime event)
This is the daytime offering of the Stamp-A-Stack #1 for Christmas Holiday Cards. I will be hosting four Stamp-A-Stack events in December (a Stamp-A-Stack #1 daytime and evening and a Stamp-A-Stack #2 daytime and evening event). The #1 classes will offer the same cards during the day and evening events but will be different cards from the #2 classes.
Thursday Dec 9, 2010 at 7:30pm - 9:00pm Stamp-A-Stack #2 (evening event)
You will get to make 15 Christmas/Holiday ** cards (5 cards each of 3 different cards). The fee is $20 and includes a roll of ribbon to complete your cards and you get to take the rest of the roll home. You can make a second set of cards for only $15 (additional sets will not include an additional roll of ribbon). Please let me know how many cards you would like to make when you RSVP.
This is the daytime offering of the Stamp-A-Stack #2 for Christmas Holiday Cards. I will be hosting four Stamp-A-Stack events in December (a Stamp-A-Stack #1 daytime and evening and a Stamp-A-Stack #2 daytime and evening event). The #1 classes will offer the same cards during the day and evening events but will be different cards from the #2 classes. I will try and post photos on my blog very soon. ** You can feel free to leave the sentiment off and change them into general holiday cards.
Mon Dec 13, 2010 at 10:00am - 12:30pm Stamp-A-Stack #2 (daytime event)This is the daytime offering of the Stamp-A-Stack #2 for Christmas Holiday Cards. I will be hosting four Stamp-A-Stack events in December (a Stamp-A-Stack #1 daytime and evening and a Stamp-A-Stack #2 daytime and evening event). The #1 classes will offer the same cards during the day and evening events but will be different cards from the #2 classes. I will try and post photos on my blog very soon.
Please RSVP by December 1st so I have supplies prepared for each participant.
** You can feel free to leave the sentiment off and change them into general holiday cards.
Here is a sneek peek of what the Stamp-A-Stack #1 cards look like.


I wanted to let you know that I still have space in some of my Holiday Stamp a Stacks. If you haven't heard, the schedule is as follows:
Tuesday Dec 7, 2010 at 7:30pm - 9:00pm Stamp-A-Stack #1 (evening event)
Still need time to get your Christmas Cards finished? Now is the perfect time. Come over and get a few more Christmas/Holiday ** cards checked off your list.. ..and nibble on some holiday candies while you’re here.
You will get to make 15 Christmas/Holiday ** cards (5 cards each of 3 different cards). The fee is $20 and includes a roll of ribbon to complete your cards and you get to take the rest of the roll home. You can make a second set of cards for only $15 (additional sets will not include an additional roll of ribbon). Please let me know how many cards you would like to make when you RSVP. This is the evening offering of the Stamp-A-Stack #1 for Christmas Holiday Cards. I will be hosting four Stamp-A-Stack events in December (a Stamp-A-Stack #1 daytime and evening and a Stamp-A-Stack #2 daytime and evening event). The #1 classes will offer the same cards during the day and evening events but will be different cards from the #2 classes. I will try and post photos on my blog very soon.Please RSVP by December 1st so I have supplies prepared for each participant.
** You can feel free to leave the sentiment off and change them into general holiday cards.
Wednesday Dec 8, 2010 at 10am-11:30am Stamp-A-Stack #1 (daytime event)
This is the daytime offering of the Stamp-A-Stack #1 for Christmas Holiday Cards. I will be hosting four Stamp-A-Stack events in December (a Stamp-A-Stack #1 daytime and evening and a Stamp-A-Stack #2 daytime and evening event). The #1 classes will offer the same cards during the day and evening events but will be different cards from the #2 classes.
Thursday Dec 9, 2010 at 7:30pm - 9:00pm Stamp-A-Stack #2 (evening event)
You will get to make 15 Christmas/Holiday ** cards (5 cards each of 3 different cards). The fee is $20 and includes a roll of ribbon to complete your cards and you get to take the rest of the roll home. You can make a second set of cards for only $15 (additional sets will not include an additional roll of ribbon). Please let me know how many cards you would like to make when you RSVP.
This is the daytime offering of the Stamp-A-Stack #2 for Christmas Holiday Cards. I will be hosting four Stamp-A-Stack events in December (a Stamp-A-Stack #1 daytime and evening and a Stamp-A-Stack #2 daytime and evening event). The #1 classes will offer the same cards during the day and evening events but will be different cards from the #2 classes. I will try and post photos on my blog very soon. ** You can feel free to leave the sentiment off and change them into general holiday cards.
Mon Dec 13, 2010 at 10:00am - 12:30pm Stamp-A-Stack #2 (daytime event)This is the daytime offering of the Stamp-A-Stack #2 for Christmas Holiday Cards. I will be hosting four Stamp-A-Stack events in December (a Stamp-A-Stack #1 daytime and evening and a Stamp-A-Stack #2 daytime and evening event). The #1 classes will offer the same cards during the day and evening events but will be different cards from the #2 classes. I will try and post photos on my blog very soon.
Please RSVP by December 1st so I have supplies prepared for each participant.
** You can feel free to leave the sentiment off and change them into general holiday cards.
Here is a sneek peek of what the Stamp-A-Stack #1 cards look like.


Hope you can join us tonight or at one of the SAS events this week. Email me at
StampingWithRose-Ellen@cox.net or call me at 703-200-2340.
Monday, November 29, 2010
In like a lion.....
Hi there My Stamping Friends,
For me it seems like the Holiday season 'comes in like a lion'. I'm not really sure where summer went and now we're already past Thanskgiving and we're gearing up for Christmas. WOW!!!
Well, December for me means making LOTS of Christmas Cards. I've been making a few at a time for the last several months but I still have a bunch more to go. This is a card that I created after seeing so many different versions on Stampin' Connection (which is sort of a version of FaceBook for Stampin' Up! demonstrators~and you can have access within moments if you purchase the $300+ kit on sale now for less than $88). Thanks to all my fellow demonstrators for the inspiration.

The base of this card is cherry cobbler. I used the Big Shot to cut out a top note die from confetti cream cardstock. The tree branches were made using Lovely as a Tree with old olive ink and the sentiment was stamped in cherry cobbler using Four The Holidays. The strip of DSP and the ornament was punched from papers from the Jolly Holiday pack. I used the silver tinsel as an ornament hook and wrapped one end around the ornament and put the other end through the top note die so it looks like its hanging on a branch. It might looke like a complicated card but it wasn't at all.
If you want to purchase any of the items needed to make this card you can visit my website at http://www.roseelleneastman.stampinup.net/ or you can email or call me.
One more Thanksgiving project
Hello there My Stamping Friends,
I wanted to get one more Thanksgiving project posted before December arrives. Last week, one of my very talented and creative stampin' friends, Donna, showed up to hostess her club meeting with a little gift for everyone in attendance. This little guy is so cute and I had to copy him. Donna spent a lot of time freehand drawing each of the heads and cutting out each piece for the face. She made the body with the Milk Carton die and the Big Shot (and you all know how much I LOVE my Big Shot). I believe she made the tail with some large heart punch. Here is her creation.


For my turkey I also used the Milk Carton die and the Big Shot. I used our Full Heart punch and the scallop circle punch for the tail. I used the Round Tab Punch for the head, a point of the star punch for his beak and the Heart to Heart for his waddle and ...hmm...thing that's on his head. For his eyes I used the Black Flourish Designer Jewels from the Holiday Mini Catalog (they aren't just for Halloween Projects!!). I used Teeny Tiny Wishes for the sentiment and used the word window and modern label punches along with dimensionals to show it off.
As always if you want to purchase the items you need to create a project like this you can visit my website at http://www.roseelleneastman.stampinup.net/ or call or e-mail.
Hope you enjoy the project and have a great day,
Rose-Ellen
I wanted to get one more Thanksgiving project posted before December arrives. Last week, one of my very talented and creative stampin' friends, Donna, showed up to hostess her club meeting with a little gift for everyone in attendance. This little guy is so cute and I had to copy him. Donna spent a lot of time freehand drawing each of the heads and cutting out each piece for the face. She made the body with the Milk Carton die and the Big Shot (and you all know how much I LOVE my Big Shot). I believe she made the tail with some large heart punch. Here is her creation.

I had to CASE these turkeys for my Thanksgiving table and of course I only use Stampin' Up! products and I needed to make it easy so my girls could duplicate them, so here is what I came up with.


For my turkey I also used the Milk Carton die and the Big Shot. I used our Full Heart punch and the scallop circle punch for the tail. I used the Round Tab Punch for the head, a point of the star punch for his beak and the Heart to Heart for his waddle and ...hmm...thing that's on his head. For his eyes I used the Black Flourish Designer Jewels from the Holiday Mini Catalog (they aren't just for Halloween Projects!!). I used Teeny Tiny Wishes for the sentiment and used the word window and modern label punches along with dimensionals to show it off.
As always if you want to purchase the items you need to create a project like this you can visit my website at http://www.roseelleneastman.stampinup.net/ or call or e-mail.
Hope you enjoy the project and have a great day,
Rose-Ellen
Sunday, November 28, 2010
Happy Thanksgiving!!!
My Dear Stamping Friends,
I hope you all had a wonderful Thanksgiving Holiday. Our family certainly had a lot to celebrate this year. The most wonderful news is that our daughter Shannon celebrated one full year of being in remission from cancer. Thank God!! And Thank You for all the prayers and support you've shown us for the past few years. We had my sister-in-law and her husband and boys over for a yummy Thanksgiving dinner and had a wonderful time.
Friday was a busy day. As a Make A Wish family, we were asked to represent MAW and ride with Santa and Mrs. Claus on their horse drawn carriage in a local parade. My husband and our youngest daughter and I watched from the best seats in the house while our three older girls got to ride the carriage.


And here is a simple card I made with some inspiration from Stampin' Connection (which is sort of a Facebook for Stampin' Up! demos). This is a great time to remind you that Stampin' Up! is running a promtion where the entire contents of the starter kit (valued at $310+) only costs $87.50!! You can find out all the details by clicking on the link above (if you're getting this post in a reader you need to visit my blog to see the link).
 This card features Autumn Splendor and the woodgrain background stamp. I used the rock-n-roll technique for the leaves and Teeny Tiny Wishes for the sentiment.
Enjoy the cards and enjoy the rest of your Thanksgiving weekend.
Rose-Ellen
I hope you all had a wonderful Thanksgiving Holiday. Our family certainly had a lot to celebrate this year. The most wonderful news is that our daughter Shannon celebrated one full year of being in remission from cancer. Thank God!! And Thank You for all the prayers and support you've shown us for the past few years. We had my sister-in-law and her husband and boys over for a yummy Thanksgiving dinner and had a wonderful time.
Friday was a busy day. As a Make A Wish family, we were asked to represent MAW and ride with Santa and Mrs. Claus on their horse drawn carriage in a local parade. My husband and our youngest daughter and I watched from the best seats in the house while our three older girls got to ride the carriage.


After that we were home for a little bit before we headed off to a local town celebration where Shannon was asked to light the town's Christmas tree with the Mayor and then meet Santa. It was another fantastic celebration and we all had so much fun.


We are so fortunate and blessed and so thankful!!
I want to let you all know that I am thankful for you as well. To my amazing downline, you make my job so much fun! To my wonderful Stamping Friends, you are one of the biggest reasons I love this job and I am very thankful that I have you in my life. To my wonderful family, thank you for your unconditional support. I couldn't do this without you.
Here is a card that I saw on someones blog. I loved it so much I had to CASE (Copy And Share Everything) it almost exactly. I used the Day of Gratitude stamp set and the decorative label punch here. Feel free to contact me with any other questions about the card. I thought I knew who's blog I saw it on but when I just went there to get a link, it wasn't on her blog. Hmmm....If its yours and you find it before I find you, let me know and I'll post a link here.

And here is a simple card I made with some inspiration from Stampin' Connection (which is sort of a Facebook for Stampin' Up! demos). This is a great time to remind you that Stampin' Up! is running a promtion where the entire contents of the starter kit (valued at $310+) only costs $87.50!! You can find out all the details by clicking on the link above (if you're getting this post in a reader you need to visit my blog to see the link).

Enjoy the cards and enjoy the rest of your Thanksgiving weekend.
Rose-Ellen
Saturday, November 27, 2010


Monday, November 15, 2010
All the supplies in the Full Starter Kit for only $87.50 !!!
Hi there My Stamping Friends, Have I got some news to share with you today!!!
 This is an unprecedented OPPORTUNITY and this is NOT a MINI KIT!!! This promotion is for the FULL STARTER KIT....a $310+ value for only $87.50. AMAZING!!! On top of that you'll get FREE SHIPPING for your starter kit!!
Run, do not walk, to your nearest telephone or computer and contact me with ANY questions. I'm available to help you anytime!
I'm putting on my best television announcer voice now so here are the details:
~~~~~~~~~~~~~~~
What do you call it when you get over $310 in crafting and business supplies for only $87.50? You call it an amazing deal but we're calling it an amazing opportunity! From November 15-30, you can purchsae either our Standard or Digital+ Starter Kits at 50% off the reguarl retail price of $175 (PLUS FREE SHIPPING!), and enjoy these great benefits as a Stampin' Up! demonstrator.
Here are a few of the benefits of purchasing the Starter Kit:
If you've ever considered doing this or if your considering it now, you can check out more information about becoming a demonstrator on my website here. Click on the link that says 'Start your own business' (you DO NOT have to commit to anything at that point). You will be able to find lots of information there including a video, the benefits of being a Stampin’ Up demonstrator and more information on Stampin’ Up!. If you are still interested in even more information you can click on the button on the left that says ‘join now’ (you still don’t have to commit to anything) At that point you can read the agreement more info about joining, and get any questions answered, without having to commit to anything. If you have all your questions answered and want to sign up, it will ask you for a password and my password is "newrecruit" without the quotes. You can be a demo in a matter of minutes and have access to the Stampin’ Up! website full of ideas and inspiration.
Please let me know if you have any questions. I can be reached on my cell phone at 703-200-2340.
Have a great day!!
Rose-Ellen

Run, do not walk, to your nearest telephone or computer and contact me with ANY questions. I'm available to help you anytime!
I'm putting on my best television announcer voice now so here are the details:
~~~~~~~~~~~~~~~
What do you call it when you get over $310 in crafting and business supplies for only $87.50? You call it an amazing deal but we're calling it an amazing opportunity! From November 15-30, you can purchsae either our Standard or Digital+ Starter Kits at 50% off the reguarl retail price of $175 (PLUS FREE SHIPPING!), and enjoy these great benefits as a Stampin' Up! demonstrator.
Here are a few of the benefits of purchasing the Starter Kit:
- $310+ worth of supplies for only $87.50.
- Earn a minimum of 20% income on your purchases.
- Be your own hostess and earn your own hostess rewards.
- Sharing creativity with other demonstrators, family and friends.
- Make new and lasting friendships.
- Enjoy access to nearly unlimited creative ideas.
- Receive a free subscription to an exclusing monthly magazine.
- Receive two free months subscription to your own busniess website.
- Ability to preorder your items a month before the published date.
- Opportunity to earn free products and incentive trips.
Here are a few benefits of joining my team:
- Enjoy local downline meetings to share creative and business ideas with your peers.
- Join us via Skype at my downline meetings.
- Travel with people you know to the Stampin' Up! Regional Meetings, Annual Convention and Leadership Seminars.
- Join our team on-line for answers to any of your questions.
- Attend my quarterly two day stamping and cropping events FREE.
If you've ever considered doing this or if your considering it now, you can check out more information about becoming a demonstrator on my website here. Click on the link that says 'Start your own business' (you DO NOT have to commit to anything at that point). You will be able to find lots of information there including a video, the benefits of being a Stampin’ Up demonstrator and more information on Stampin’ Up!. If you are still interested in even more information you can click on the button on the left that says ‘join now’ (you still don’t have to commit to anything) At that point you can read the agreement more info about joining, and get any questions answered, without having to commit to anything. If you have all your questions answered and want to sign up, it will ask you for a password and my password is "newrecruit" without the quotes. You can be a demo in a matter of minutes and have access to the Stampin’ Up! website full of ideas and inspiration.
Rose-Ellen
Thursday, November 4, 2010
Its amazing what Silver Tinsel Trim will do.....
Hi there My Stamping Friends, Today I'm jumping ahead a little bit and I'm sharing two Christmas Card I recently made. First I made a very simple card inspired by a card that I saw online, and then I jazzed up my first verion a bit. The first version is fine, but isn't it amazing what a little Silver Tinsel Trim will do. What do you think?


For these cards I used: Bashful Blue for the card base and ran it through the Big Shot using the Perfect Polka Dot impression folder. I stamped the ornament in real red ink on whisper white cardstock and punched it out using the ornament punch. I used Candy Cane Christmas designer series paper to dress up the bottom of the card. Teeny Tiny Wishes is my current go-to set for sentiments and I used it here with the Modern label punch and some real red sponging around the edges. I dressed up the ornament with Basic Rhinestones and on version #2 I used some Silver Tinsel Trim on top of the ornament.
Hope you like the cards,
Rose-Ellen
Tuesday, November 2, 2010
Autumn Cards from the Baltimore Regional
Hi there My Stamping Friends,
I hope you all had a fantastic Halloween. We certainly did at our house. We went to lots of fun Halloween parties at the girls schools and in our neighborhood, spent lots of time trick or treating and my girls ended up with LOTS of Halloween candy. Before they even dug in to thier loot, they actually pulled out a large amount of it to give to a homeless shelter for kids that didn't have an opportunity to go trick-or-treating. Apparently they WERE paying attention in church that morning when our priest suggested the idea. I'm a proud Mama!!
Anyway, with Halloween over (Boo Hoo Hoo!!!) I thought I'd share a few more cards from the Stampin' Up! Baltimore Regional. This time I'll cover the Fall/Thanksgiving theme. If they are your cards, please let me know and I'll give you credit.
I'm working on a charity cropping event scheduled for this weekend at the Dunn Loring Volunteer Fire and Rescue Department (you can friend us on facebook and find all the info) so my week is pretty booked up. I hope this tides you over. Of course if you'd like to purchase any supplies feel free to call or e-mail me or shop 24/7 online at my website http://www.roseelleneastman.stampinup.net/
Enjoy!
Rose-Ellen


Subscribe to:
Posts (Atom)